Build a smart switch with a La Frite and a solid-state relay!
Here’s a quick overview
Mostly as a fun project, I built a smart switch using a La Frite and a solid-state relay, and I wanted to share it here!
You can schedule when you want the relay to switch on/off using a web app that looks like when2meet. I’m using it to turn a Christmas tree on/off, but of course you could plug anything into it. 
Look, pictures!
Here’s a photo of the tree being powered with a cat in the way! The device is the white/black 3D printed box with the plug that you can kind of see on the right hand side of the picture.
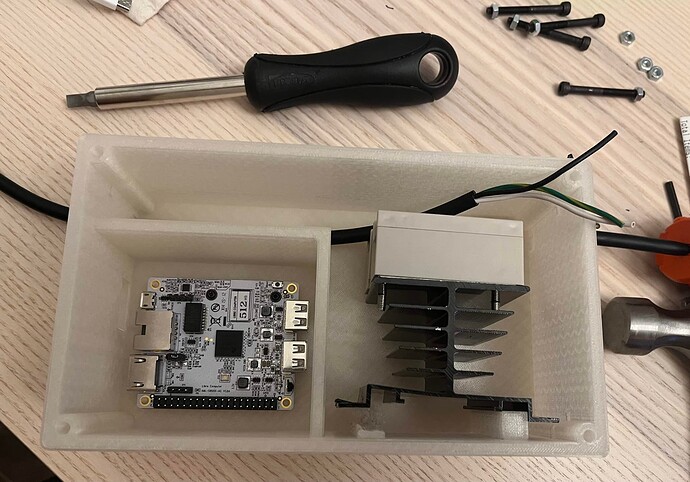
Here’s a photo of the inside of the box during assembly. Not much to see, but still kinda fun. I had to do some splicing and squeezing with heat shrink to make sure everything fit safely… PLEASE BE VERY CAREFUL WITH MAINS VOLTAGE!
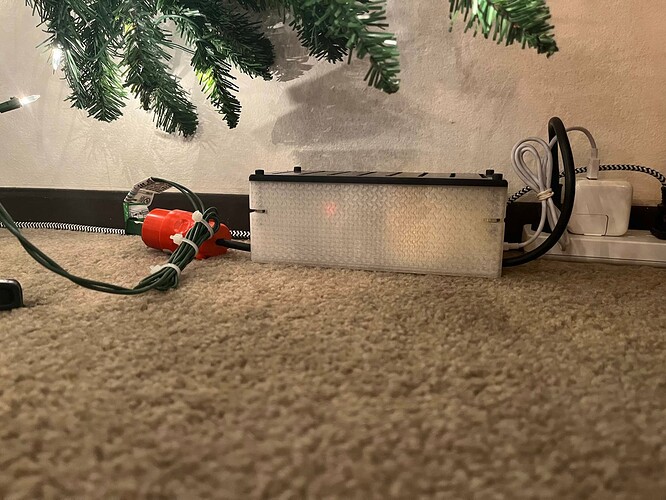
Finally, here’s a photo of the whole thing sitting on the floor. It’s not too big, but also not too small. The dimensions of the box are 190mm x 110mm x 70mm. The cords stick out a bit too. But hey, it works and it’s safe!
The computer/hardware setup is barebones
I’m running Ubuntu 22.04 "base" on a La Frite. It has a 16 GB eMMC installed and a USB WiFi adapter. I flashed the eMMC with no problems following this guide from my Macbook.
Only one GPIO pin and a ground pin are used to control the solid-state relay. So I chose the pins arbitrarily from this spreadsheet which details the translation between physical pin # and logical #.
This is the solid state relay I got off of Amazon. Not sure if it’s in stock anymore. It’s a 25A max current DC switch-side, AC power-side solid-state relay. It comes with a heatsink.
I bought this plug off of Amazon for this project, too. For the mains cord I used an old cord from a broken charger.
The software is totally open-source!
The software for this project is publicly available on GitHub here. It is licensed under CC0 1.0 Universal so please feel free to copy from the code as you please!
The project hosts a web server using Flask that looks a lot like when2meet. You can schedule when you want your device to be turned on/off in chunks of 15 minutes. You could make those chunks coarser or finer by changing some pieces of the code. It saves the schedule data just as JSON to a text file on disk. Not very elegant but it works!
There is a script that you can have run at startup called start-flask assuming the git repo is in your home directory. The script will auto-start the web server and appropriately power the GPIO pins.
I will work on better documentation in the future! For now, please feel free to poke around the code and see how stuff works.
The enclosure is 3D printed
I 3D printed an enclosure for the smart switch using black and clear PLA on a Prusa printer. I built an STL file for the enclosure using CadQuery. You can find the script that was used to generate the enclosure in the enclosure subdirectory of the GitHub repo.
I ended up putting some posts in the wrong spot for the relay heatsink. So, I just broke them off. She’ll be right…
I used M4 screws and nuts to hold everything together. I couldn’t find screws long enough to go all the way through the box, so I just cut slots in the side of the 3D model to push nuts into. It was a tight fit but it worked. Removing the support material was a pain.
Summary
- I built a really basic smart switch with a Libre Computer and solid state relay!
- The software and enclosure design are totally open-source. Feel free to steal them!
- The La Frite hosts a web app and controls a relay with GPIO pins.
- The project has a 3D-printed enclosure.
- All in all it cost ~$20-$40 more than a commercial smart switch, but it was a lot of fun to build, and the web interface is really handy compared to having to download an app or something.


